Showing posts with label painting. Show all posts
Showing posts with label painting. Show all posts
Tuesday, October 11, 2011
A Beautiful Sunset Treasury on Artfire
Isn't this a lovely collection ? My vintage leaf brooch is second row down, center!


AND what is even better - I just got this curated collection in MY email!!!! This means that it was sent to thousands of people!!! WOOT!


Friday, September 16, 2011
The Power of Three:
This is a story about the Power of Three.
About new beginnings, friendship, and a short stretch of hard work.
What it equals = change, some peace, and lots and lots of love.
Jennifer and I have known each other since I dated her brother in college. She was 11 years old at the time, and I was the object of her affection. She is the youngest of his 3 siblings, and when he and I parted ways - she was determined to hold on - and I am so glad she did. We are no longer friends - we are sisters.
Jennifer has lived in her home for about ten years. She had done a lot of work on the house already - but there were rooms that had yet to be done. This is an adorable 1950's house. The living room, dining room, and kitchen have been redone. But the bathroom, den, and upstairs dormer-ed bedroom still needed attention.
She had spent the summer away - and when she returned - it was time...
Off to Sherwin Williams to find some paint colors - and a call to me that said "Too many color choices - I have them narrowed down but I'm not sure I can have the paint ready - because I'm not sure which colors to go with"!
DAY 1:
The chips were taped all over the den and bathroom walls when Ginna (my daughter) and I arrived, around 11 am on Wednesday morning. Perfect! We chose wall colors for each of the rooms, and a ceiling color for the den and bathroom. After our color decisions were made - we went to Sherwin Williams to buy the paint and necessary supplies. Then off to the grocery to buy lunch and breakfast food, back home again for lunch - and then to get started!!!


We started with the walls. Be forewarned - I am NOT a taper. Don't even show me that blue stuff. When I get ready to paint - I want to paint! We threw some drop cloths over the bed, the antique dresser was safe over in the other corner - it would be a while until we got over there.
The color we chose for this room - Watery SW6478 in a satin finish. The white trim is the SW stock white in a semi gloss. I am a die hard Duration fan for house, wall and trim paint. It was the first of the paints on the market 8 or 9 years ago (they actually call it a 'coating') to have primer already in it. It is marvelous.

*** Just FYI - as much as you may be tempted - don't stop at one coat of paint for your walls. No matter what color you are covering - the new color you chose, will have so much more depth and be so much richer, when you do coat number two.*** It also goes on faster than the first coat - no kidding!

DAY 2:
We were on a mission this morning - we wanted to get at least one coat of paint on the ceiling in the den before our 9 am. 'appointment' to surprise my Mom at crafts. Every Thursday from April through November, the 'craft' ladies meet at St. Mary's Church. They will hold their Christmas Bazaar this November on Saturday the 12th from 8 to 5 and Sunday the 13th from 8 to 1. It's the best! We had to get moving - we were going to spend our next three hours being creative with the crafty stuff!

Our colors du jour in the den are Recycled Glass SW 7747 for the walls and Snowbound SW 7004 for the ceiling. This is a great white - it is not too white - but it really isn't pink, gray or yellow. The same trim white that we used upstairs was used in this room too.


Time to clean up and go out for a LATE dinner at The White Rose downtown. We were going to meet my friend Kerri. Our 'perk' for all of our hard work today. Good food, good friends and laughter. The perfect end to a day filled with accomplishments!
DAY3:
Up early - coffee and a quick bowl of cereal. We did a second coat on all of the brown, finished trimming out the white, and painted the ceiling.
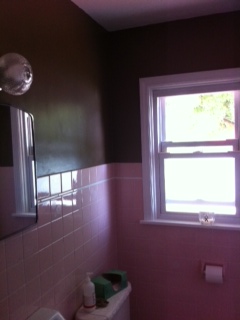

The color we used here is Cobble Brown SW 6082. We tried for a pale pink for the ceiling - but it had too much blue in it. So we went with the Snowbound in here too. The trim is the semi gloss stock white that we used in the other two rooms.

We have plans for brown and pink towels. As you can see in the shallow closet - we are working on a vintage pottery collection in pink and white to hold all those bathroom necessities!
We also rearranged the living room, shifted some furniture in the dining room, and reorganized Jen's candle collection - which was quite a task all in itself ;)
We still have finishing touches to put here and there - but the bulk of the work is done. It just goes to show what you can do with a little help from your friends! Oops - sisters! ;0
Thursday, July 28, 2011
From Drab to Fab!
Entered in MissMustardSeed's Furniture Feature Friday (http://missmustardseed.com/2012/03/furniture-feature-friday-favorites-a-link-party-7/)- to anyone coming from her blog - Welcome!!
My continuing mission to simplify my life - is resulting in a new vision for my sweet 1909 home. Yes - this is all related to the workroom organization, etc...
I started with the Living Room and the Master Bedroom. The major work on the Living Room is just getting my jewelry/other crafting items out of there - and up to the workroom. Some of this has gotten done, but I have put that on hold so that I could make major changes in the Master Bedroom. My friend Jennifer came down for a few days - and we went to work! I love the overall look of this room - but it had been in the same basic configuration for 20 years. I know, I know! Some of this is because it it a small 1909 home and the room has windows/a door on three walls, and has NO closets. First we took the two biggest pieces of furniture - the bed and the wardrobe - and moved them into place. Then we determined that one cupboard would stay - but the two taller chest of drawers had to go.
I would have to find a low, 6 or 9 drawer dresser to take their place. That meant doing a wardrobe overhaul as well (as in making some of my clothes go away - ouch!). Luckily for me, Jennifer is one versatile girl!
Fortunately, within days of needing a new dresser - I found one at an estate sale for $25.00 (I loved that!). Ugly - but I saw that it had potential - hence the title of this post - from Drab to Fab!
My continuing mission to simplify my life - is resulting in a new vision for my sweet 1909 home. Yes - this is all related to the workroom organization, etc...
I started with the Living Room and the Master Bedroom. The major work on the Living Room is just getting my jewelry/other crafting items out of there - and up to the workroom. Some of this has gotten done, but I have put that on hold so that I could make major changes in the Master Bedroom. My friend Jennifer came down for a few days - and we went to work! I love the overall look of this room - but it had been in the same basic configuration for 20 years. I know, I know! Some of this is because it it a small 1909 home and the room has windows/a door on three walls, and has NO closets. First we took the two biggest pieces of furniture - the bed and the wardrobe - and moved them into place. Then we determined that one cupboard would stay - but the two taller chest of drawers had to go.
I would have to find a low, 6 or 9 drawer dresser to take their place. That meant doing a wardrobe overhaul as well (as in making some of my clothes go away - ouch!). Luckily for me, Jennifer is one versatile girl!
 |
| Here it is - The top was all scratched and had paint splotches all over it - and the wood finish was questionable. It did, however, have dust protectors between each row of drawers, and was well built - even though it was only about 10 years old. It also had great lines or good bones - very important!! |
 |
| The 'stuff' on top is just there for now - I am still working on what will stay and go - although I an pretty sure the transferware will stay! |
I removed the hardware, washed the dresser inside and out, sanded where I needed to, and then gave it a first coat of paint - I wasn't sure what color I wanted, so I started with a blue/grey. The second coat was a cream color, ending with the top and base being painted a taupe color - a suggestion by another friend Jennifer Huffman, who sells awesome furniture and other cool stuff at the Old Lucketts Store. I shabbied it up just a bit, and then gave it a coat of Butcher's Paste Wax. The hardware was a really ugly color of dark/bright brass so I used a dry brush technique and hit it with the blue/grey paint, and then used the same light touch with the cream color paint. This whole process, from beginning to end, was done over the course of three days. So no big deal - Really!
I love the way it looks - and it was definitely worth getting rid of some clothes to trade out 2 dressers for 1!
More photos of the rest of the room soon!
Subscribe to:
Posts (Atom)
